ROS stands for the Robot Operating Sysem [ROS Wiki]. However, it is not really an operating system, but can be instead classified as middleware that works on operating systems like Ubuntu, and now recently, also Windows. This means that ROS essentially acts as a middle-man or an interface between multiple computational processes. ROS also hosts a HUGE library of community-developed open-source packages. This is a great advantage for roboticists as many standard robotics algorithms/processes/strategies are avaialble as open source packages and you no longer need to re-invent the wheel for common applications. ROS also provides a great deal of other tools and utilities such as simulation environments, debugging tools, logging sensor measurements and data analysis.
ROS its not only extensively used in research but also in the industry. Which is why I was surprised when none of the ‘open-source’ self-driving robot kits (Donkey Car, NVidia JetRacer, Amazon DeepRacer) used ROS but instead their own software. So, I decided to build a ROS-based self-driving car myself. I decided to use ROS1 for this project, as I already had previous experience with it. ROS2 has only recently been released and I’m currently in the process of learning it.
Design and Implementation
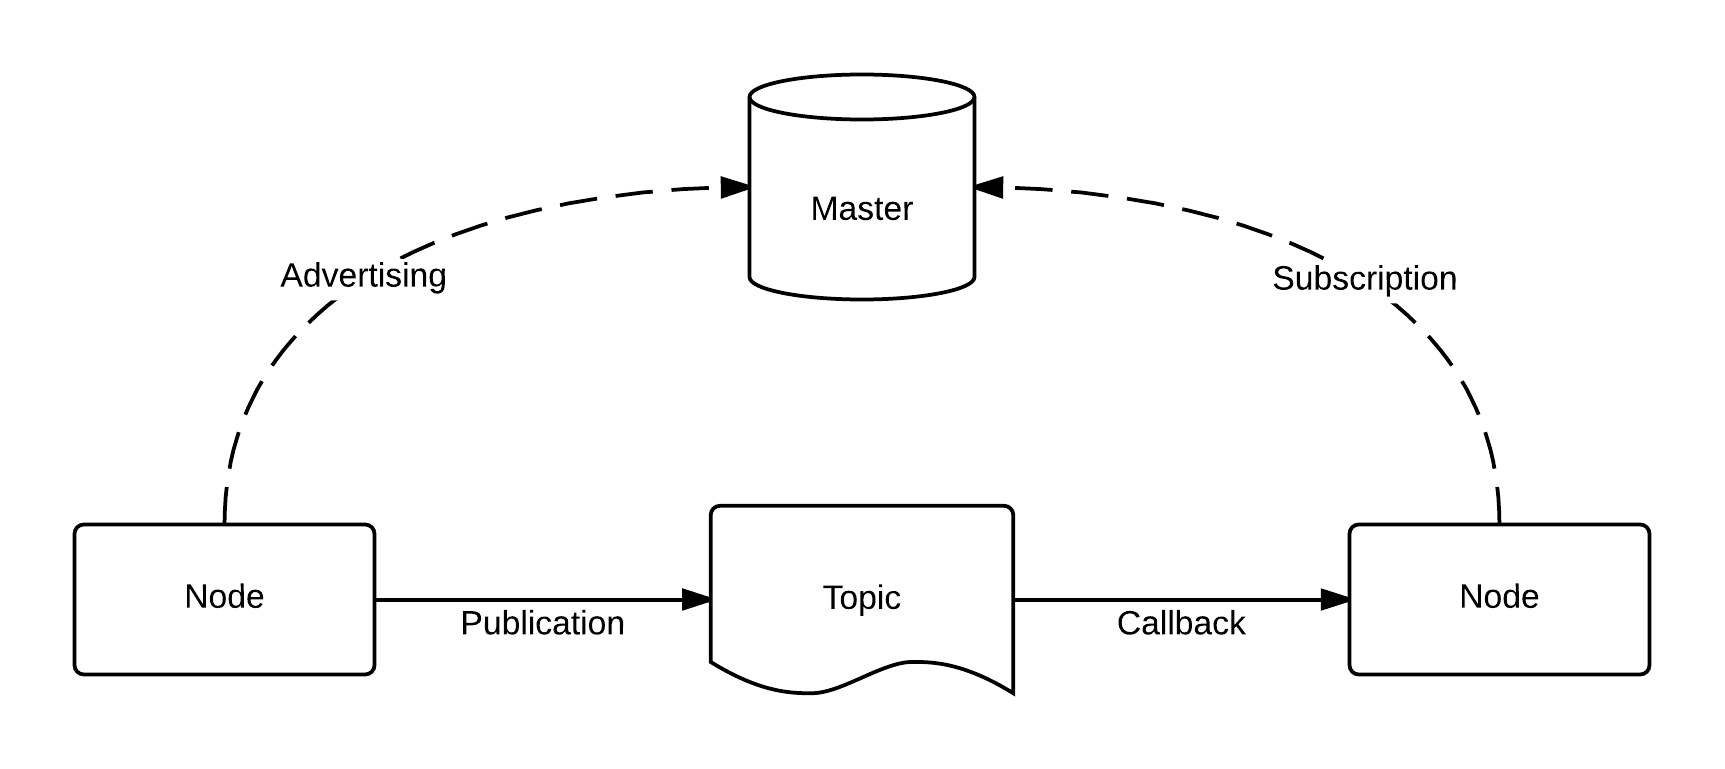
The ROS communication infrstructure uses a pub/sub architecure, which allows computational processes (called Nodes) to publish or subscribe to pre-defined data types (called Messages) from pre-defined communication channels (called Topics). Nodes can be publishers (like an odometry node that publishes odometry sensor measurements), or subscribers (like a motor controller node that subscribes to control inputs) or both (like a sensor fusion node that subscribes to multiple sensors and publishes a filtered sensor measurement)
Since the last blog, I have built and tested the following nodes:
Motor Calibration and Control
For motor control, I use the PCA9685 I2C servo control board, which communicates with the Jetson Nano using the I2C protocol. I found a handy package built by Bradan Lane called ros-i2cpwmboard. This package is written in C++ and communicates ROS messages to the I2C board. This package subscribes to PWM data and communicates these signals to the board and then to the motors.
On top of this, I wrote a low_level_controller node in Python that subscribes to standard velocity commands from other nodes and converts that to PWM data which is then published. For this computation, I needed to calibrate the throttle and steering to measure the center values, which was then stored in a YAML file. The low level control node reads this configuration file and uses the calibrated values stored in it.
I mean to automate this calibration step so that I can use it as a utility for other cars I might build in the future. But I’ll leave to later.
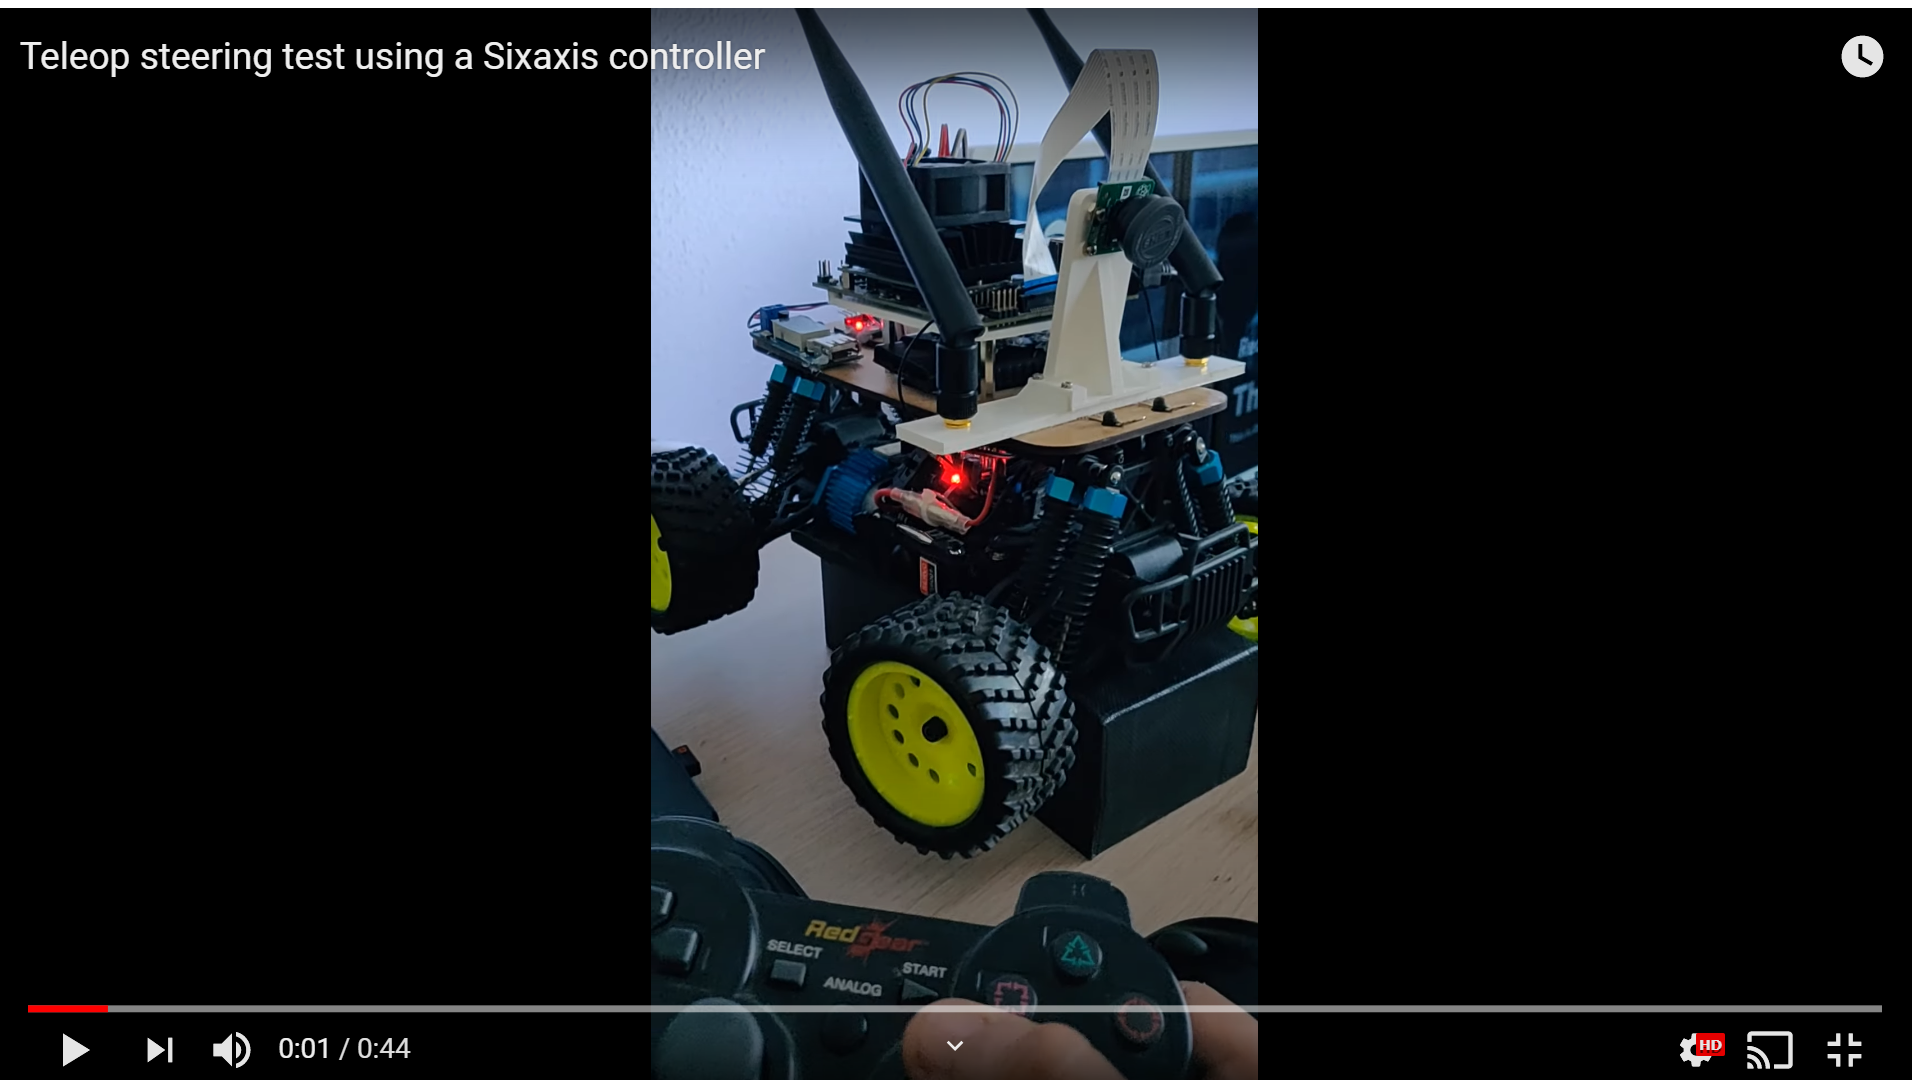
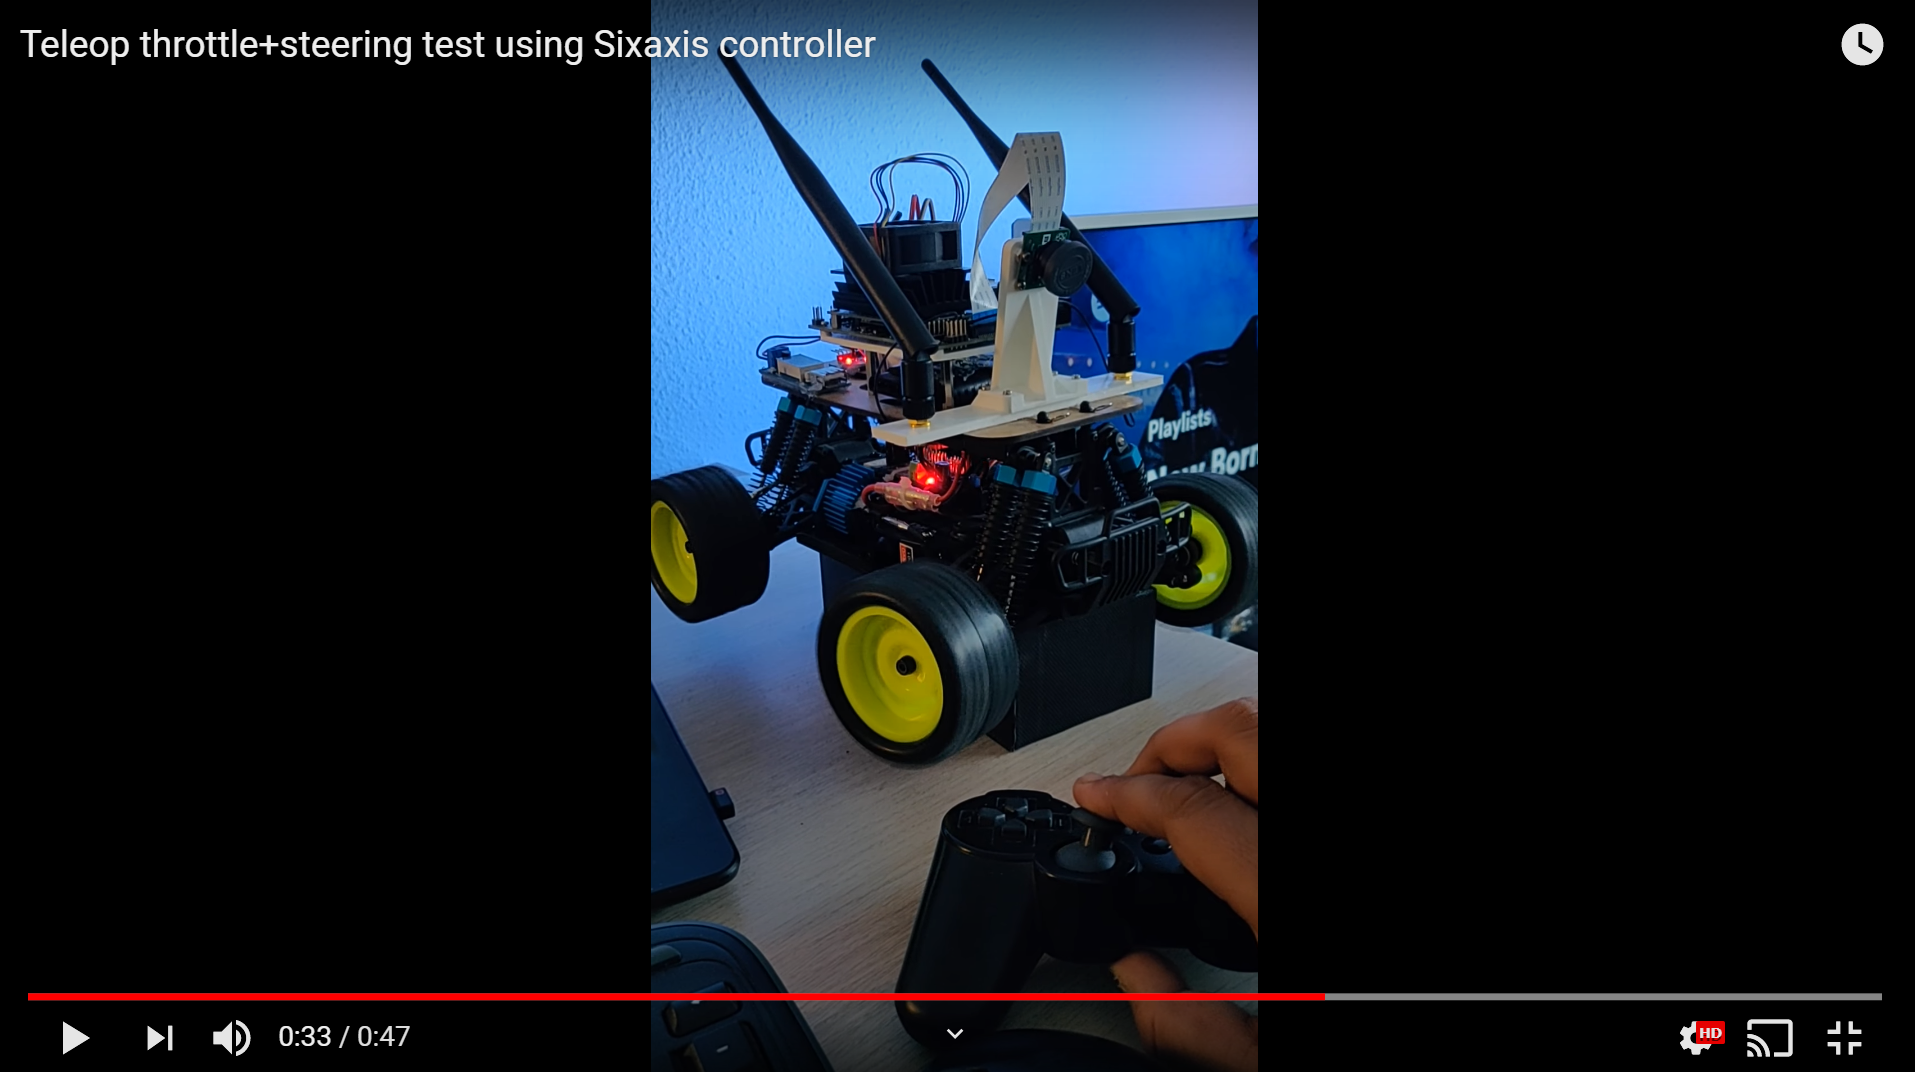
Joystick/Keyboard Teleop Controller
Now that the motor control is done, I need to provide a way to give it some velocity commands. For starters, I used the teleop_twist_keyboard package, which is a standard ROS package to provide velocity commands from your keyboard. I used this to test the motor controller and once that was working fine, I moved on to configuring the Sixaxis joystick.
For the joystick, I used the (joy)[http://wiki.ros.org/joy/Tutorials/ConfiguringALinuxJoystick] package and its tutorials based on C++. Since I have a 3rd party controller, I had to map the buttons to the package. This mapping was again stored in a YAML file and the implemented node was modified to read the config file and use its values.
IMU Calibration + Data Acquisition
Once again I found a handy library for the IMU calibration and data acquisition. However, this one is not based on ROS. The package is called the RTIMULib and it is very efficient C++/Python library for off-the-shelf IMUs. RTIMULib works with the IMU I’m using - MPU6050, so I could directly use this library. To calibrate the IMU measurements, I first used the library and its included Qt based GUI to automatically calibrate and store the calibration results in a .ini file. The RTIMULib was then included in a C++ program, and the calibrated sensor values were used to measure angular velocities and accelerations. A ROS publisher was then implemented to publish these IMU measurements to the rest of the ROS system.
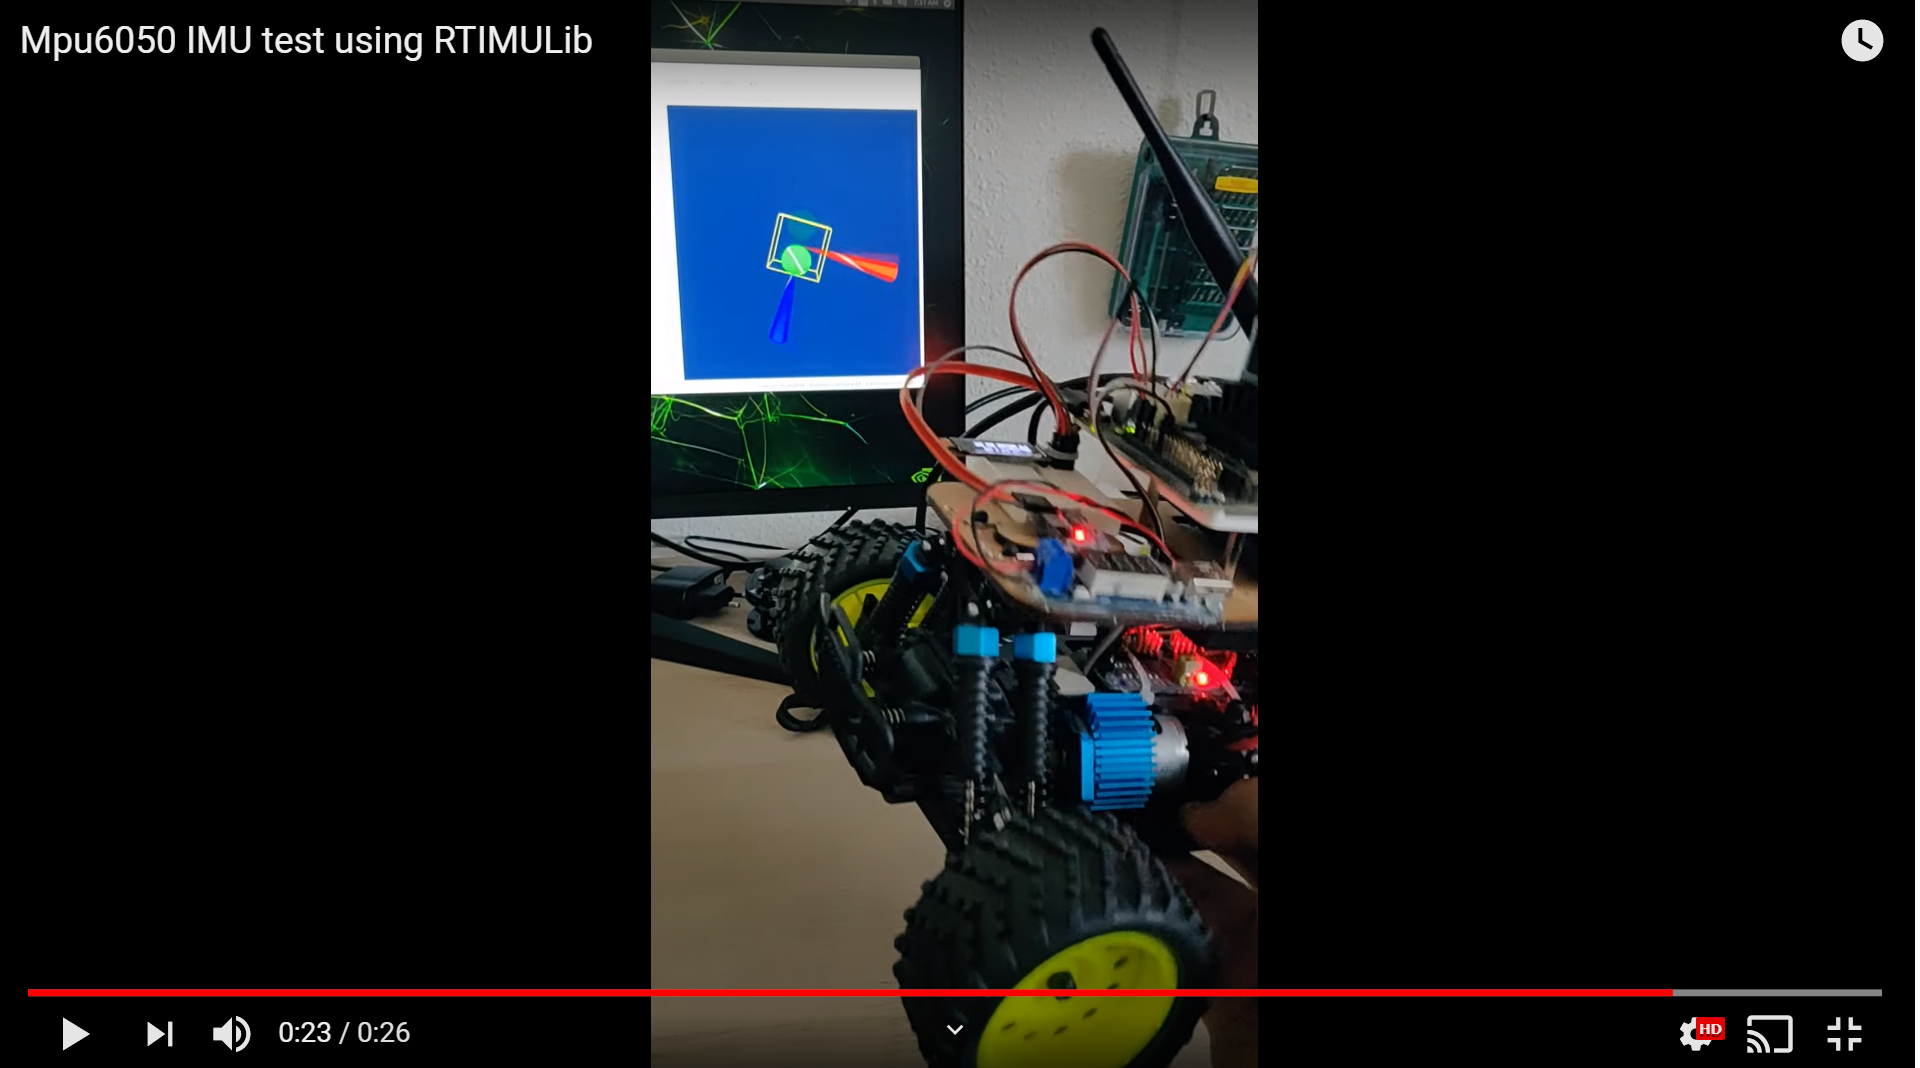
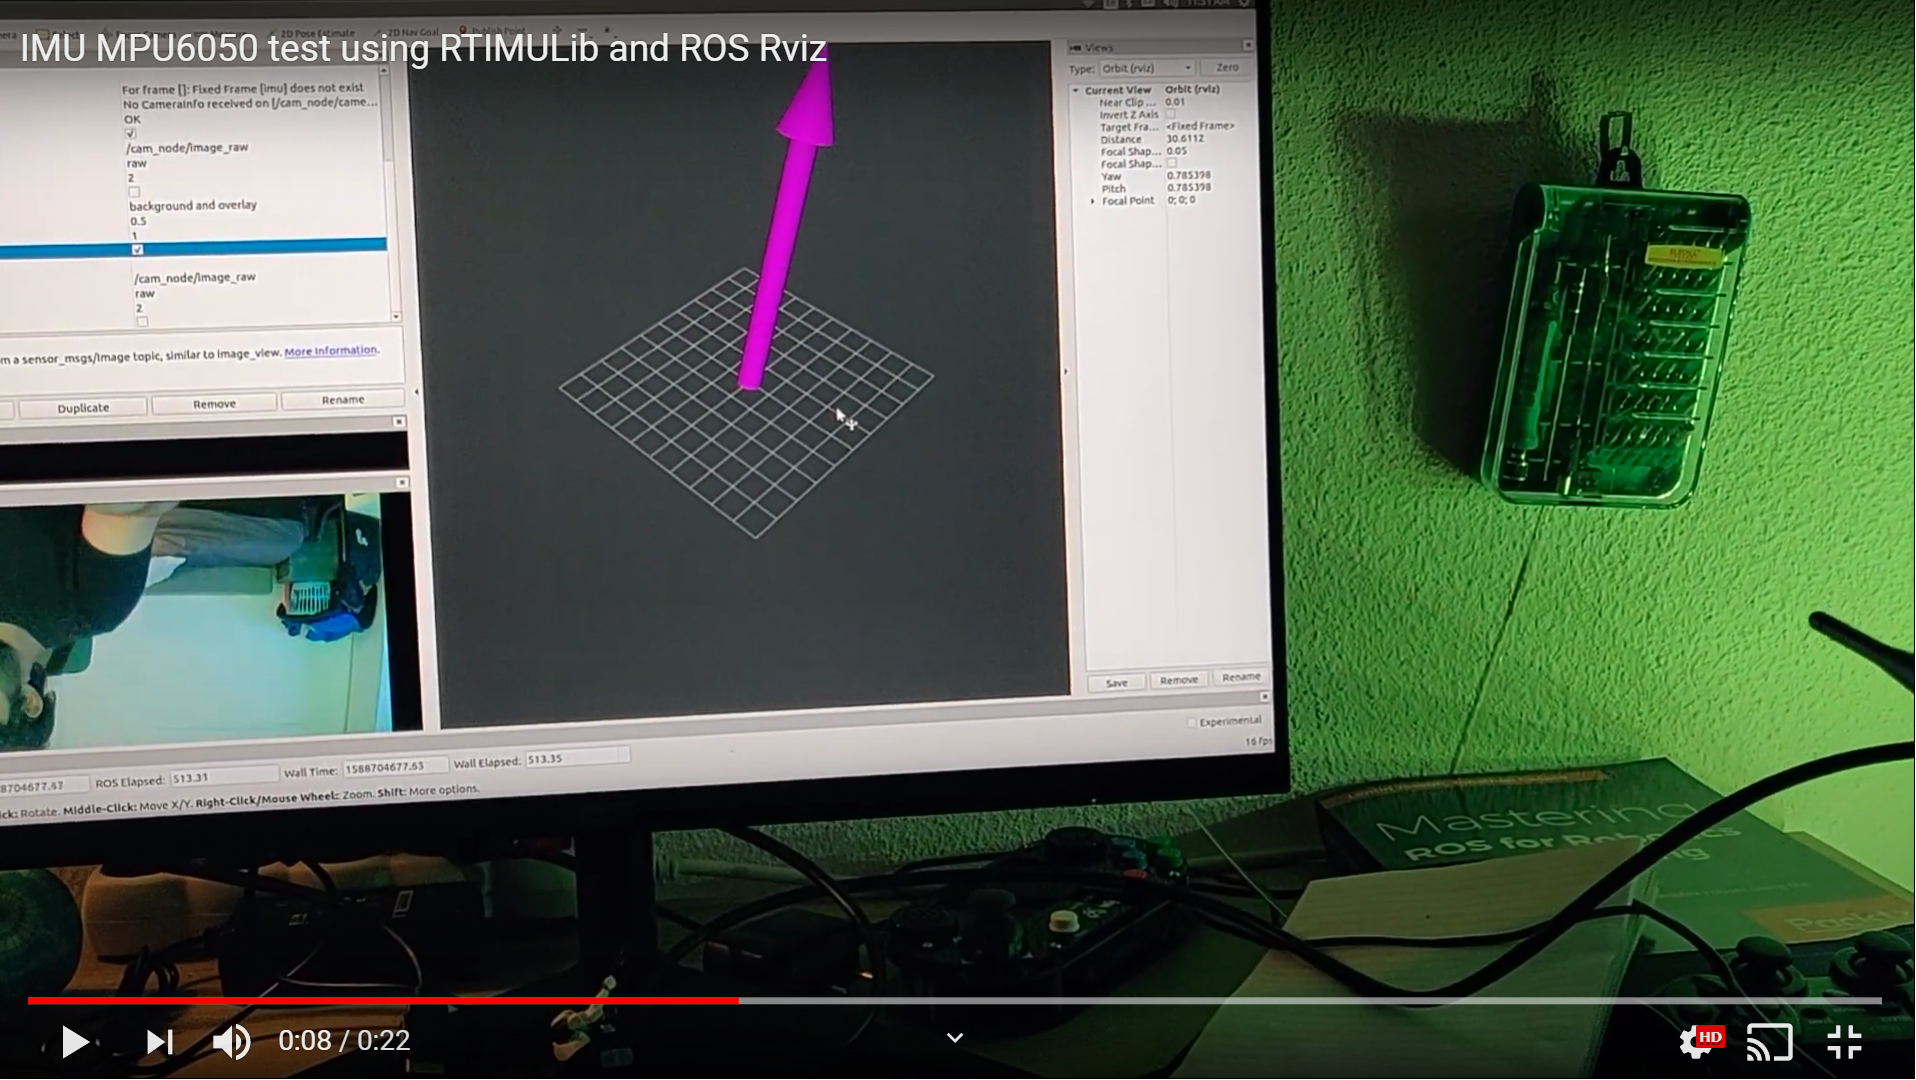
I have to be honest, I’ve never implemented or configured an IMU this quickly in my previous projects. The RTIMULib library is that amazing.
Odometry
For the Odometry, I have a ring with seven magnets on the main shaft of the vehicle. These sensors are detected by a hall-effect sensor attached to the base of the car. The hall-effect sensor works on a 5V logic level while the Jetson Nano GPIO only provides 3.3V. I did not have a logic level cconverter lying around, so I decided to use an Arduino Nano for this purpose. I was meant to use an Arduino Nano anyway, to implement start/stop buttons and notification lights, so I did not have to make many changes to the hardware setup. The sensor measurements are read by the Arduino Nano, which then computes the number of rotations of the shaft and sends its via serial protocol over USB. I use the rosserial package to package and communicate the data between Arduino and ROS over serial.
I haven’t gotten around to implement/test this node completely, so I will be updating about this in a future blog.
Camera
The camera node is slightly different since I am not using a USB camera but instead the Raspberry Pi camera using the CSI interface. For this, I picked up a ready-to-use jetson_camera node from Github. I used this as-is, without any modifications.
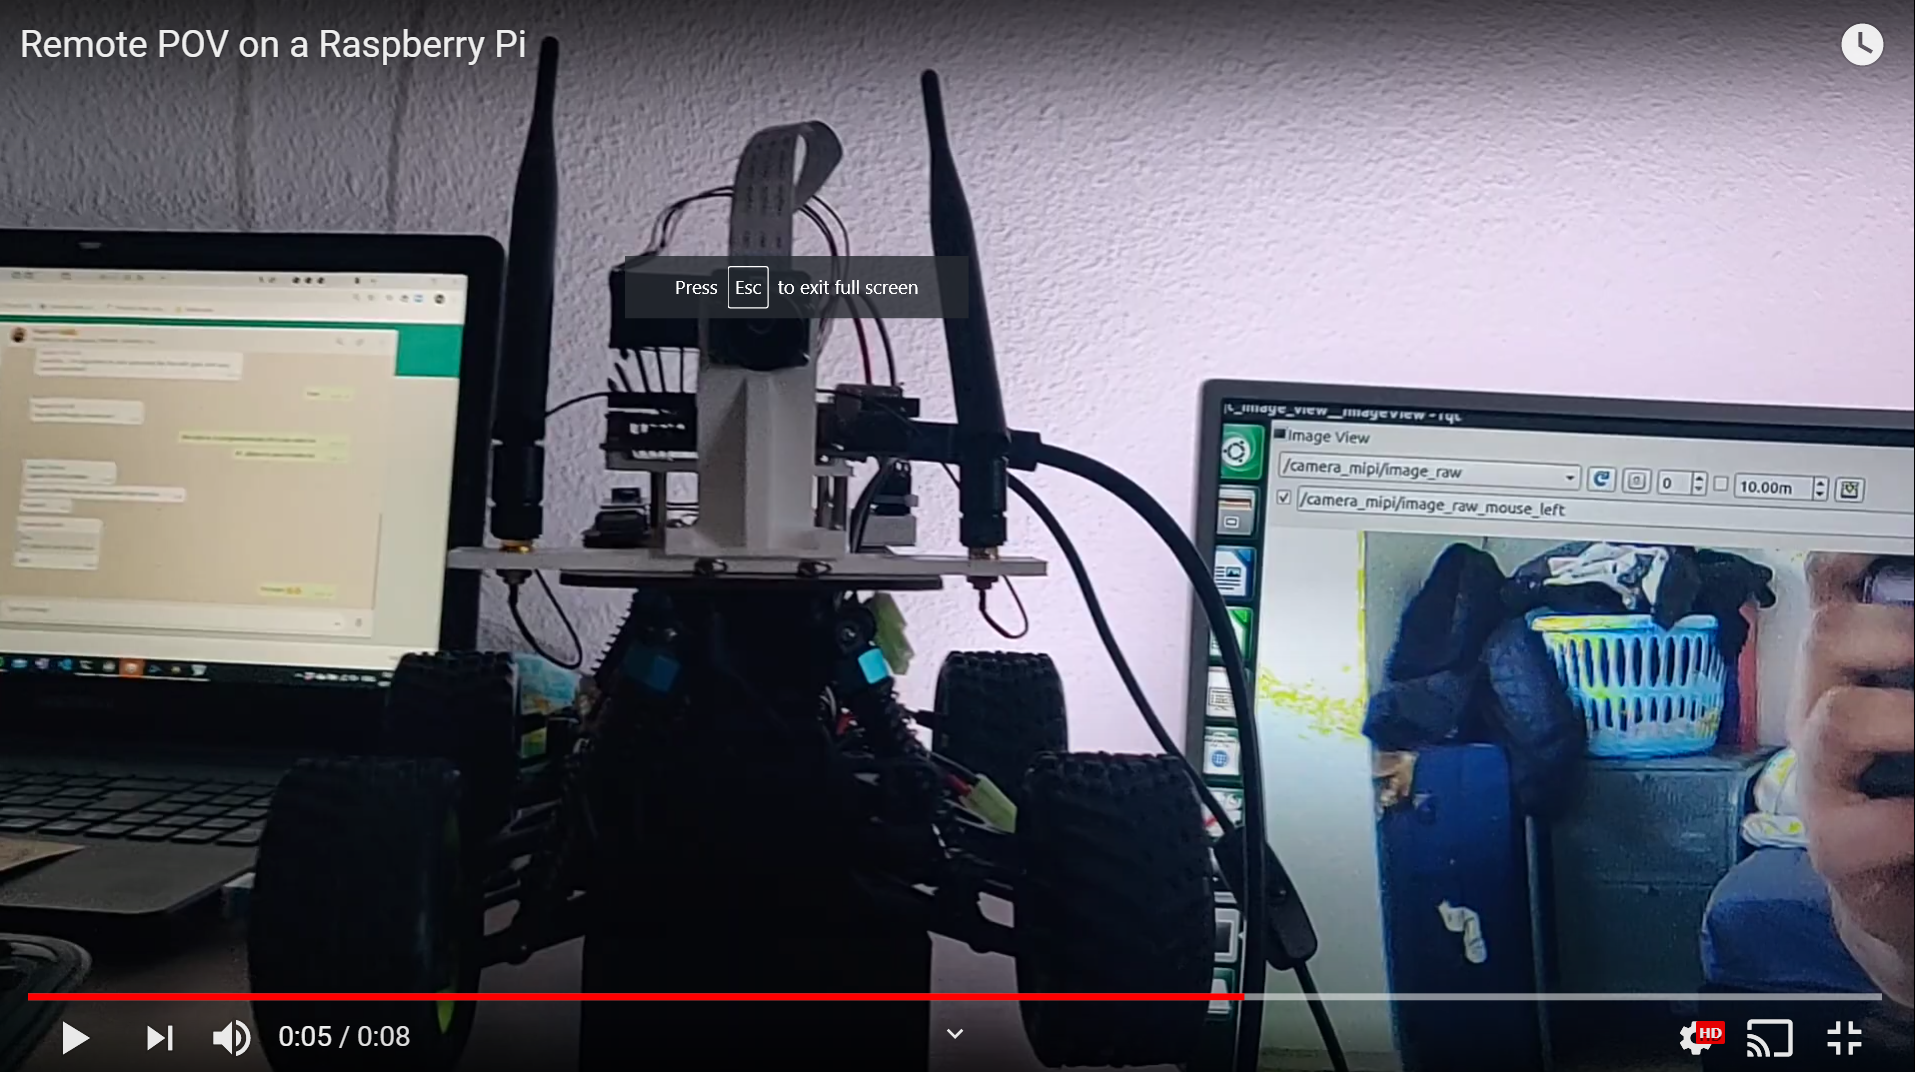
Remote POV
For remote teleop and POV, I used a Raspberry Pi with a GameHat. Using this, I want to publish velocity commands to the vehicle and subscribe to the compressed camera image. For this, I connected the Raspberry Pi to the same wireless network as the Jetson Nano and used rosbridge_suite to read topics from the Jetson Nano on a web browser on the Raspberry Pi. I am yet to design the velocity command publisher, but that’s for a later stage since I don’t quite need the remote Wifi teleop at the moment, the Joystick works just fine.
Tools and Utilities
As explained earlier, ROS also provides a lot of tools and utilities to make testing/debugging easier. These are some of the tools I have currently been using:
RViz/WebViz
RViz is a visualization environment, where a user can visualize topics and messages in a world-model-like visualization. I have been using this tool to see the camera data, IMU information as well as the odometry estimates. WebViz is a web-version of RViz that I recently read about. I have yet to integrate that with the rest of the vehicle, but I’ve used it with pretty neat results. More updates about this in later blogs.
PlotJuggler
PlotJuggler by Davide Faconti is one of my favourite tools to use. It allows for easy plotting and analysis of topics and its messages. I’ve used it extensively for plotting IMU and odometry measurements while testing these individual subsystems.
ROSBag
ROS Bags (rosbag) are storage files where sensor information can be logged and replayed for later use. When these ROS bags are played, they provide the stored sensor information in the same format (topics/messages) as they were recorded in. This makes the ROS Bag tool extremely useful for recording certain information like IMU measurements and then using it to simulate the IMU while testing some other subsystem.
Launch Files / Launching at startup
Once everything was all set and ready, I used the roslaunch package to run these several nodes together. The launch configuration is written in .launch files and this includes all information for the system to start the ROS application - including nodes to run, topic names, initial parameter values, among other things. Once a launch file was defined for the system, I used the wrote a service that runs this launch file at startup. This means that I just need to turn on the Jetson Nano and once I also turn on the joystick, I am ready to go without having the need to physically run the launch file from the Jetson Nano terminal.
Next Steps
I have a few next steps in mind. For the month of July and August, I plan on learning CAD and designing some new parts for the robot (the cardboard baseplate is already bending because of the battery pack). I plan on getting new parts either 3D printed or cut in acrylic. I also expect to finish the little things that I need to get the car finished - like finishing the odometry functionality, writing a start/stop recording function for the joystick node, fusing the IMU and Odometry data using an extended Kalman filter, and cleaning up all my debug comments.
Once all that is done, time to setup the ML infrastructure and to start training my vehicle to drive on its own!